 Contact
Home
Chapters
Windows PCM Audio
I seriously doubt that when designing the earliest computers anyone expected them to find their way into the heart of modern home entertainment. When the first home computers became available most people deliberately kept them well away from their televisions and stereos, thinking of them as different things, with different purposes.
Probably the first home computer to play music was the Exidy Sorcerer, using a parallel port ladder DAC called "The Sorcerer's Voice". The first computer to say it's own name was the Victor 9000, using an internal speaker and bit density scheme similar to modern DSD. Then following the release of the IBM-PC, which was widely adopted for home and small business use in the 1980s, buss mounted Sound Cards started appearing on the market. Finally, in the early 1990s the General Midi, specification was published and widely adopted, making computer based instrumental music practical for the first time.
As time and technology moved on, the problem of storage for large multimedia files was solved by increasing hard drive density. At the same time the problem of playing recorded audio was solved by WAV Format audio that used a scheme of PCM Encoding to store recorded music, speech and sound effects. Then, finally the development of multi-stream audio and video files, using Codecs to allow the combining and size reduction (compression) of files made the Home Theatre PC and eventually the embedded computers in televisions and audio equipment practical.
Now listening to music or watching a movie is as simple as clicking on a file. Almost every aspect of home entertainment is computer driven. Music and movies are stored digitally and played back through digital to analog conversion almost entirely replacing the audio and video systems of just a few years ago.
Plus, one of the smartest decisions in all of this has been to make the audio outputs on these devices compatible with the Line Level inputs of consumer audio equipment. This allows us to move off of those terrible plastic computer speakers and into playback systems of far better quality simply by running a cord over to our stereo or AV systems. Today's computers now rival the sound quality of "high end" audio products.
So lets investigate, see how Windows audio works and hopefully learn how to get the best sound quality from it.
Multimedia files Home Top Chapters
The audio sub-system in Windows is based on linear PCM which works by processing Digitally Sampled audio signals that are stored in various file formats.The rate at which the waveform is sampled determines the Maximum Frequency that can be later reproduced. This is basically 1/2 the sampling rate. The most common rates are 44,100hz, 48,000hz and 96,000hz. (hz = times per second) although other rates both higher and lower are permitted.
Each sample represents the amplitude (voltage) of an audio waveform at a specific point in time. The bitwise size of the samples determines the Dynamic Range and precision of the resulting stream of samples. The most common sample sizes are 16bits and 24bits but sample sizes of 8, 16, 24 and 32 bits are permitted.
Each audio format file and the audio part of video files stores data that decodes to a stream of PCM samples. There are multiple formats for these files, some of which incorporate very complex algorithms aimed at reducing file size. The most common audio formats are .WAV, .MP3, .AAC and .FLAC, although there are (too) many other formats.
There is a Redbook Standard established with the introduction of Compact Disks that says a sample rate of 44,100hz with sample sizes of 16bits should be adequate to deliver "audible perfection" from these files. More recently the concept of High Definition audio has taken both rates and sizes well beyond this standard.
When you play a song or watch a movie, your media player is responsible for loading and using a Codec (in software) to decipher the file and hand it over to Windows as a stream of PCM samples. Since each type of file requires a different decoder the player will hopefully select the best one for you, based on the file extension and meta-data stored in the file itself.
Once decoded into a stream of PCM samples, the stream is handed over to the Windows Audio Subsystem (WAS) for further processing.
Shared mode Home Top Chapters
 Windows is a multitasking environment where applications and devices are used more or less randomly by its users. This creates a complex sound management environment where simultaneous audio streams can be triggered by any or many applications and devices as well as by the system itself. The Audio Subsystem's job is to reproduce all these sound streams as accurately as possible.
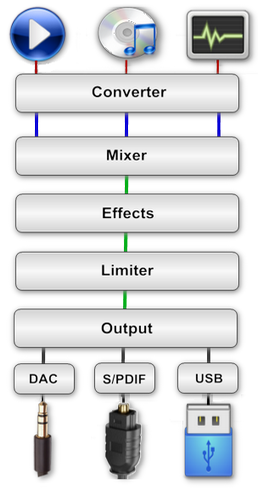
Studying this from Microsoft Documentation is a major chore. It is surprisingly complex, bound to leave just about anyone scratching their heads. I'm also not going to delve into the inputs in this essay; that's a whole other head scratcher. While it does not accurately represent the complexity of the software itself, the simplified diagram at the right does illustrate the user experience.
Each stream's first stop on this journey is the Converter. Once in the Converter, all samples are converted to 32bit values. Unused bits in 24, 16, and 8 bit samples are padded with zeros; silence. Then stream sample rates are adjusted to the common speed you've set. This common sample rate as well as the final sample size is a user setting found in the Sound applet at:
Control Panel -> Sound -> [Output Device] -> Properties -> Advanced
Many applications will use the rate and size settings in the Sound applet when creating streams, making rate conversions unnecessary. This improves both sound quality and efficiency but this is not always possible with file based playback where they are intended to be played at specific settings.
Once adjusted for compatibility, the stream is passed to the mixer where all samples from all streams are volume adjusted per the settings in your audio mixer applet:
Right Click the Speaker icon on your task bar then "Volume Mixer"
Once adjusted, all streams are then merged into a single stream that is passed to the Effects engine where you can optionally add any number of modifications such as echo effects, bass boost, room correction and more. The effects are also user settings found in the Sound applet at:
Control Panel -> Sound -> [Output Device] -> Properties -> Enhancements
The next stop is the Limiter which will "soft clip" any samples that get too close to the digital limit by turning down the level of that specific half cycle of the waveform. This appears to trigger at about -1db of full scale. This is generally a pretty harmless thing as it supposedly only prevents hard clipping and properly produced streams will never get to that level. While not severe, there also appears to be a bass roll-off introduced at this stage which may be an artifact of the soft clipping since bass is often the highest level.
Next the sample stream is handed over to the Output software where the sample size is adjusted per your settings in the Sound applet's Advanced section and then routed to your chosen default output. This is also a user setting at:
Control Panel -> Sound
When adjusting this setting you will need to select the device you want to send your sound stream to and click "Set Default". You may also need to run through the "Configure" and "Properties" dialogs if this is the first time you are using this device. Also note that some media players allow you to select an Output device independently of this setting.
Finally the stream is handed to the drivers for your selected output device. The drivers are responsible for operating the hardware that passes the resulting signals to your external device. The most common outputs are a DAC built into the motherboard, an S/PDIF optical or coaxial output or a USB connected DAC.
In general this one size fits all "audio funnel" works very well. Windows is capable of excellent sound quality most of the time. But the process is not without it's problems, especially if you are looking for the very best sound quality you can get from your audio files and streams.
Sample sizes Home Top Chapters
Generally there is no problem manipulating the output Sample Size. The samples stack together in Little Endian format (most significant bit to the right) as shown below. Since the samples go out most significant bit first, size conversion is a simple thing to do. For 32 bits send the whole thing, for a 24 bit depth only send the first 3 bytes, for 16 send 2 and for 8 bits you only send the first one. This results in no loss of volume level but can affect dynamic range. When the sample is the same size or smaller than your choice in the Sound applet, this works perfectly.
Using a larger sample size is not going to give you any real advantage. Most audio streams are 16 bits, so up sampling to 24 (for example) just ends up harmlessly sending a 3rd byte padded with zeros and does not affect dynamic range at all.
Conversely, setting your device to (for example) 16 bits with 24 bit samples will reduce it's dynamic range somewhat and some of the really low volume, hopefully inaudible, sounds can be lost when the sample is truncated. Truncating at 8 bits will almost certainly produce a noticeable reduction in dynamic range and a noticeable loss of low level sounds since most audio files are 16 bits or more.
Compressed files (.MP3, .AAC, etc.) pose something of conundrum. In general they are made from other files that do have a PCM sample size but when decompressing them the sample size is supposedly lost. Some even claim they have no sample size. This is demonstrably incorrect since when reconstructing the original file the decoders will end up with output values that are the same as the sample values used to create them. They may be decoding the file into 32 bit variables but they are actually storing the original sample values. If that original data was in 16 bit format they end up with a 32 bit value with the 16 zeros for the lower two bytes, which is effectively a 16 bit sample. Similarly 24 bit samples will have the lowest order byte filled with zeros. So, yes, there is a detectable sample size, even if it's not obvious.
So, how do you know what sample size to use?
Mostly, you don't. Windows will process multiple simultaneous streams with different sample sizes and it blindly sends them to your output device at the size you picked in the Sound applet. In general, picking the largest size your output device can handle is the safest bet. It likely won't improve sound quality but it will prevent the software from unnecessarily dropping active bits.
Sample rates Home Top Chapters
Unlike changing sample sizes, the changing of sample rates to suit your setting in the Sound applet is not benign. Accomplished by complex algorithms, some of the changes can be rather extreme.Increasing sample rates means the Converter has to add samples into the stream. For small rate conversions this can often pass without notice but for larger conversions it can be quite drastic.
Example 44,100 to 48,000
Padding samples: 48,000 - 44,100 == 3,900 per second
Insertion Rate : 44,100 / 3,900  == 1 in 11 samples
Decreasing sample rates means it has to remove samples from the stream. This is almost never benign, removing data is removing quality, increasing the difference between the now adjacent samples.
Example 48,000 to 44,100
Excess samples: 44,100 - 48,000 == -3,900 per second
Removal rate  : 48,000 / 3,900  == 1 in 12 samples
This is no longer storing recoverable data in a larger variable. It is playing with the actual contents of the stream. By the time you are converting between 96,000 and 44,100 more half of the stream content is being changed by the Converter and it is completely fair to say this changes the sound quality quite noticeably.
Since most music is stored at 44,100 samples per second, movies at 48,000 and High Definition audio using 96,000 there really is no best or even a least damaging setting you can use. My best advice would be to set it according to your habits. If you mostly listen to music use 44,100, if you mostly watch movies use 48,000 or if you are into high definition audio use 96,000 or higher. Changing the setting according to what you are currently listening to is possible but it's a rather inconvenient workaround.
But, there is a better way...
Exclusive mode Home Top Chapters
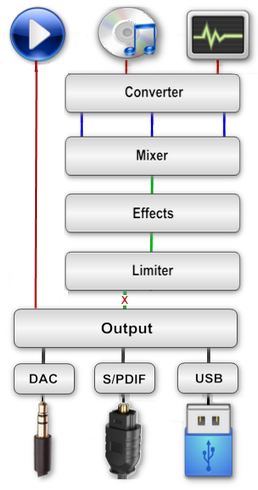 Starting with Windows Vista, the Windows audio subsystem was moved from kernel mode to user mode and largely rewritten. This new
WASAPI.
software has real advantages for the end user as software can be written to go completely around the conversion, mixing, effects and limiter steps, directly to the output driver giving it direct access to the end device. This is called
Exclusive Mode
and it can be enabled in checkboxes in your Sound applet at:
Control Panel -> Sound -> [Output Device] -> Properties -> Advanced
A secondary setting on that same page will give priority to Exclusive Mode, allowing software invoking it to halt all other sounds and play through before them. This could be useful in announcement or news situations, but shouldn't be necessary for normal multimedia use.
Exclusive Mode requires the media player to supply it's own rendering software for playback of the exclusive streams and usually this involves some user setup. The dialogs and methods vary from one media player to the next as does the completeness of the implementation. So when choosing your media player, be sure it correctly supports WASAPI Exclusive Mode outputs.
The advantage here is that with direct access it is possible to take control of the playback device, query it's capabilities and then set the best sample rates and sizes on a file by file basis. The sample rate comes from the file being played and the sample size comes from the output device's capabilities list. Both of which can be independent of your Shared mode setting.
With this level of control the file contents can be rendered directly to the output device, without modifications. This is commonly referred to as "Bit Exact" playback.
For example: if you are running a playlist of music stored at 44,100 and 16 bits, switching to a movie at 48,000 and 16 bits or high definition files at 96,000 and 24 bits WASAPI allows the player to switch the output device to the best settings on a file by file basis. Thus, you always get the intended playback quality from each media file.
And, yes, it gives you better sound quality.
WASAPI Limitations Home Top Chapters
Better sound, but, you should also know that Exclusive Mode is not without limits. (This is Windows, after all)The first thing you will discover is that, since Exclusive mode is a player driven feature, most of your other software will still play sounds by the Shared method and will be blocked during Exclusive Mode. For example: your web browser will still use the Shared mode and it's audio will be blocked when using exclusive mode in your media player.
With some players the sample size and rate settings you select in the Advanced settings for shared mode (above) will be used to set the maximums for exclusive mode. That is, if you set it to 16 - 48,000 some media players will down sample even high resolution files to that spec before playing them. In this case it makes sense to "max-out" this setting.
Widely used room correction software such as Equalizer APO installs itself in the effects engine and will not work in Exclusive Mode. You may be able to work around that by installing the older AC3 Filter or FFDshow Filter both of which are something of a "Swiss army knife" Codec that is invoked by your media player, decode most file types, include room correction features and stay active when Exclusive Mode is enabled.
Sound monitoring software such as VU Meter or the Orban Loudness Meter will not work in Exclusive mode.
Some esoteric or older sound cards may not support exclusive mode. Driver updates may solve this problem.
Depending on your player's renderer implementation you may also lose access to the Windows volume control as well as other audio management features. If this happens, you may want to try other players to find one that does a better job.
But don't be discouraged. Despite these infrequent limitations, if you are after the very best sound quality then Exclusive Mode with a properly enabled media player is the best way to get it.
About USB DACs Home Top Chapters
Depending on your version of Windows you are likely to run into a limitation of the default USB drivers when connecting a DAC.Windows versions up to 10 only support USB Audio 1, which limits you to 96k sample rates and 24 bit sample sizes. Thus, when purchasing a USB DAC, you may be required to download special drivers to enable USB Audio 2, in order to remove the 96k limitation.
Buyer beware. Some of these drivers have been tailored for specific DACs and may only work with that product. It is also common for 3rd party drivers to cause problems such as not being able to adjust L-R balance or use Windows internal volume control.
An alternative work around, so long as your DAC registers with plug and play, is to install the FFDshow Filter and have it resample anything above 96k down to 96k. This will give you access to a wider range of less expensive hardware, with only trivial differences in sound quality.
Also, since this limitation exists only on USB, you could try using your computer's built in sound chip or one of the SPDIF ports, if you have them.
A player example Home Top Chapters
One of the nicer players for Exclusive Mode with locally stored files is Media Player Classic (black edition). There are only three simple steps to setting up exclusive mode in this player and in my HTPC based system running Windows 10 it works flawlessly.First check to see that Exclusive Mode is enabled in your Sound applet. Then install MPC-BE on your system and get it playing your files in the regular way. (Don't worry, it's easy) Once you have it setup and working you can go to:
Menu -> View -> Options -> Audio -> Audio Renderer -select- MPC Audio RendererThen while playing various files, look in the Menu->Play->Filters list and you will see the MPC Audio Renderer. Clicking on that will let you check it's status while playing...
Then click "Properties" (right next to the pull down) set it like the image and click OK.
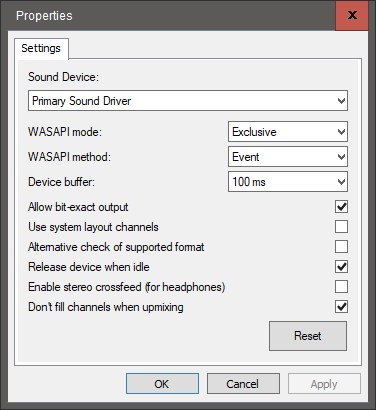
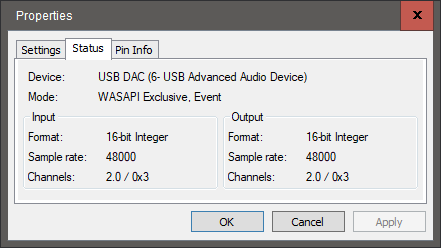
Of particular interest is how the "Format" and "Sample Rate" will tailor themselves for each type of file. This is directly addressing the stream to the device with the rest of the usual audio funnel bypassed.
If you listen for a while, you will notice more detail and clarity in the sound than you have heard before. You might also notice better bass and dynamics, in some cases. This is because the file's stream is not being altered while it is being played.
Also note that if you go back to the Audio Renderer options, you can target any output device on your system, including USB DACs simply by choosing them from the dropdown list and MPC-BE should adapt itself to them very nicely.
Of course, other players will handle this differently but the end result of file specific output settings should be the same.
Summing up Home Top Chapters
Windows audio has always been something of a mystery. It's inner workings are well documented at the coding level but the overall behaviour of the Windows Audio Session API is not well documented for the public. I hope this look under the hood was helpful and lets you get the best sound quality from your Windows based systems and devices.The Exclusive Mode is clearly the best way to play back your audio and video files. There is little subjectivity in noticing the improvement in sound quality. For me it was (and still is) obvious.
Happy listening!